
TL;DR
- Fixing a rear hub motor flat follows the same steps as a regular bike flat, plus two extras: unplugging the motor cable and handling a heavier wheel.
- The job takes about 30 to 45 minutes the first time and gets faster with practice.
- Turn the bike off and remove the battery before you touch the wheel or the motor connector.
- Support the wheel’s weight as you pull it out, so the motor cable never takes the strain.
- Riding on a flat can damage the tire, the rim, and the motor wheel itself (Upway, 2026), so stop as soon as you notice it.
What Makes a Rear Hub Motor Flat Different From a Regular Bike Flat?
Two things set it apart: a motor cable that connects the hub to the bike’s controller, and a wheel that weighs noticeably more than a standard one. Everything else, from the tube to the tire levers, works the same way.
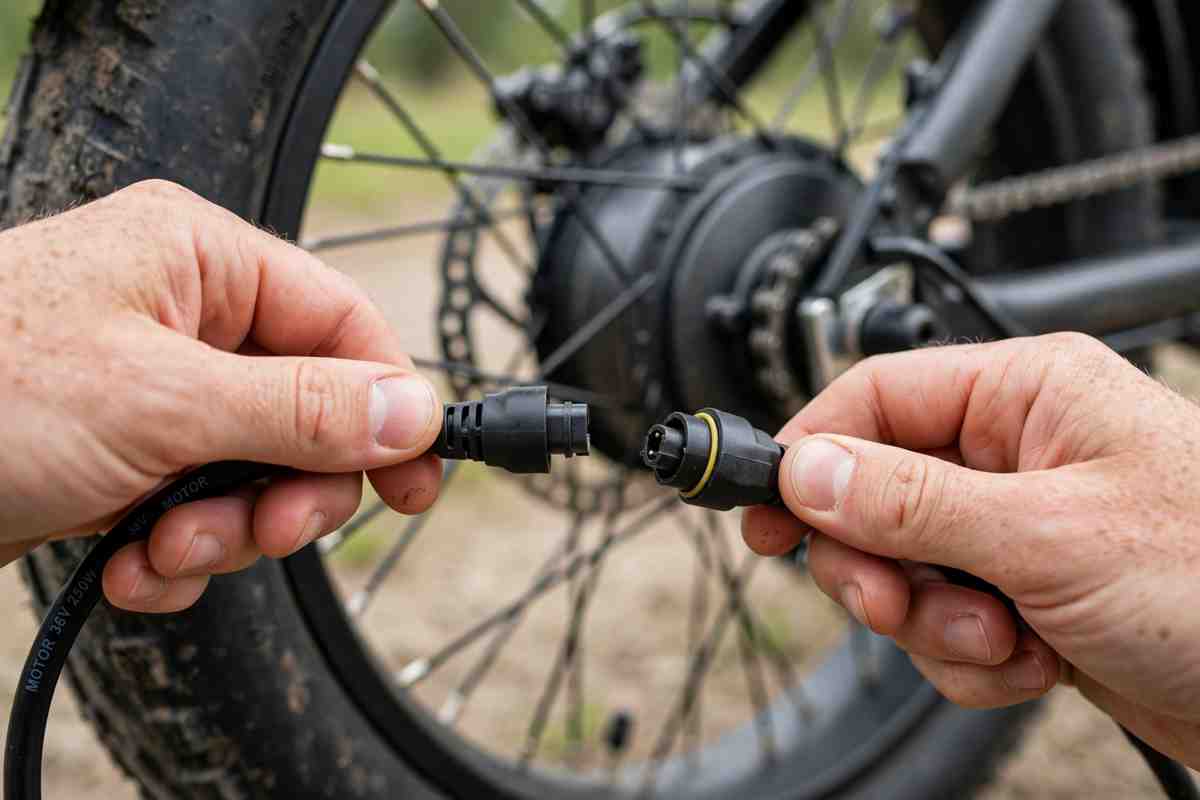
A hub motor is an electric motor built into the center of the wheel. The cable carries power and signals to it from the controller (the small computer that manages the motor). If you pull the wheel out without unplugging that cable, you can damage the wire or the connector.
Think of the cable as a lamp cord. You would unplug the lamp before moving it across the room, and the same rule applies here.
What Tools and Parts Do You Need Before You Start?
You need a spare tube in the right size, two or three tire levers, a pump, and the wrench or hex key that fits your axle nuts. Hub motor axles often use nuts instead of quick-release levers, so a standard bike multitool may not be enough.
Gather these before you begin:
- A spare inner tube that matches the size printed on your tire sidewall.
- A pump or CO2 inflator that fits your valve type.
- A wrench or socket for the axle nuts, usually 15 mm to 19 mm, but check your own bike.
- Tire levers, which are flat plastic tools for prying the tire off the rim.
- A patch kit, in case you have no spare tube.
- A few zip ties to replace any you cut while freeing the motor cable.
A bike stand makes the job easier, since an ebike is heavy to hold and flip. If you have no stand, lean the bike against a wall or flip it onto its saddle and handlebars on a soft surface.
How to Remove a Rear Hub Motor Wheel: Step by Step
Removing the wheel is the part that scares most owners, and it comes down to six actions: power off, shift gears, free the cable, unplug the motor, loosen the axle, and lower the wheel out. Take them in that order.
Step 1: Power Off the Bike and Remove the Battery
Switch the display off and take the battery out. This stops the motor from spinning up by accident and protects the connectors from a short circuit. Do this every time, even for a quick check.
Step 2: Shift to the Smallest Rear Cog
If your bike has a derailleur (the mechanism that moves the chain between gears), shift the chain onto the smallest cog before you flip the bike. This loosens the chain and makes the wheel easier to drop out.
Step 3: Free and Unplug the Motor Cable
Look near the rear dropout, usually along one of the chainstays, for the motor cable and its connector. Remove any zip ties or C-shaped clips holding the cable to the frame near the rear wheel, and take care not to cut the cable itself.
Then separate the plug. The motor plug is typically located on one of the chainstays. Some connectors have a recessed half-ring that you pull up like a handle, and others twist or squeeze apart. Check your manual if yours does not release easily.
Step 4: Loosen the Axle Nuts and Torque Arm
Undo the axle nuts on both sides. If your bike has a torque arm (a metal bracket that stops the axle from spinning in the frame under motor power), remove its bolt or loosen it first. Note which washers and arm pieces come off and in what order, because they go back in the same way.
Step 5: Lower the Wheel Out of the Frame
Hold the wheel with both hands and pull the derailleur back slightly to free the chain. Then lower the wheel straight out. Supporting the heavier hub motor wheel as you withdraw it keeps stress off the cable.
If the wheel sticks, check for a leftover cable clip or a washer tab still sitting in the dropout slot before you pull harder.
How to Find the Cause and Fix the Tube
Start by locating the hole in the tube and the object that made it. If you only patch the tube and leave a thorn or glass chip in the tire, the new tube will puncture within a few miles.
Step 6: Take the Tire Off the Rim
Let all the air out of the tube. Hook a tire lever under the tire bead (the edge that sits inside the rim), then pry it over the rim edge. Slide a second lever along the rim to free one side of the tire completely, then pull the tube out.
Step 7: Check the Tire and Rim
Run your fingertips carefully along the inside of the tire to feel for sharp points. Check the rim tape (the strip covering the spoke holes) for gaps, because exposed spoke holes can puncture a new tube from the inside.
Step 8: Patch or Replace the Tube
Use this table to decide:
| Tube Condition | Best Action |
|---|---|
| Small puncture in the tread area | Patch it, or swap in a spare |
| Damaged or leaking valve | Replace the tube |
| Long slit or pinch flat (two parallel holes from hitting an edge at low pressure) | Replace the tube |
| Tube worn thin or torn near the sidewall | Replace the tube and inspect the tire |
On the road, a spare tube is faster and more reliable than a patch. Patch the old tube at home later, so you carry a backup next time.
How to Put the Tire and Wheel Back On
Reassembly runs in reverse, and this is the stage where safety matters most. Slow down here, because a loose axle on a motor wheel can fail under power.
Step 9: Refit the Tube and Tire
Add just enough air to give the tube a round shape, then tuck it inside the tire. Push the valve through its hole first, then work the tire bead back onto the rim by hand. Avoid levers for the last section if you can, since they pinch tubes.
Inflate to the pressure range printed on the tire sidewall. Press along both sides to confirm the bead sits evenly in the rim.
Step 10: Reinstall the Wheel and Torque Arm
Lift the wheel into the dropouts with the chain on the smallest cog, and make sure the axle sits fully in both slots. Refit the washers and torque arm in the same order they came off.
Tighten the axle nuts to the torque your manufacturer specifies. A torque wrench is the right tool here, since overtightening can damage the frame and undertightening can let the axle spin out. If you do not have the number, look it up in your manual or ask the brand before riding.
Step 11: Reconnect the Motor Cable
Plug the connector together until it clicks or seats fully. Make sure no pins are bent and no dirt sits in the plug. Secure the cable with new zip ties, leaving some slack so it does not pull tight when the suspension or frame flexes.
Step 12: Run a Safety Check Before You Ride
Reinstall the battery, power on, and spin the wheel to check that the brake does not rub and the chain runs smoothly. Test the brakes. On a disc brake bike, do not squeeze the brake lever while the wheel is out, because the pads can close together. Take a short, slow test ride before you head home.
Common Problems After Fixing an Ebike Flat
Most post-repair problems come from a loose connector, a misaligned wheel, or a pinched tube. Use this table to diagnose them.
| Problem | Likely Cause | Solution |
|---|---|---|
| Motor does not respond | Connector not fully seated | Power off, unplug, and reseat the plug |
| Wheel rubs on the brake or frame | Axle sits crooked in the dropouts | Loosen the nuts, re-center the wheel, retighten |
| Tire goes flat again quickly | Object still in the tire, or rim tape is shifted | Inspect the tire interior and rim tape |
| Display shows an error code | Cable pinched or connector dirty | Check the cable path and clean the plug |
| Clicking noise under power | Axle nuts or torque arm loose | Retighten to the manufacturer’s torque |
Frequently Asked Questions About Fixing a Rear Hub Motor Flat
How long does it take to fix a flat on a rear hub motor ebike?
Expect 30 to 45 minutes the first time, including unplugging the motor and reinstalling the wheel. With practice and a spare tube ready, most riders cut that time roughly in half.
Do I have to disconnect the motor cable to change the tube?
Yes. The cable runs from the frame to the hub, and the wheel cannot come out without separating the plug. Pulling the wheel with the cable attached can break wires or damage the connector.
Can I ride my ebike with a flat tire?
No. Riding on a flat can damage the tire, the rim, and a motor wheel if one is fitted (Upway, 2026). Walk the bike or switch to a spare tube as soon as you can.
Is it harder to fix a flat on the rear wheel than the front?
Usually yes. A rear hub motor wheel carries the cable, the chain, and often a torque arm. A front wheel or a mid-drive bike (where the motor sits at the pedals) is simpler, because the rear wheel stays standard.
What size inner tube does my ebike need?
The size is printed on the tire sidewall, for example 26 x 2.4 inches. Buy a tube whose range includes your tire width and rim diameter, and pick the same valve type (Schrader or Presta) as your current one.
What if I cannot get the wheel out of the frame?
First check for a hidden cable clip, a washer tab, or a torque arm still bolted in place. Then check that the chain is on the smallest cog and the derailleur is pulled back. If it still sticks, take the bike to a shop instead of forcing it.
Should I carry a spare tube and tools on every ride?
Yes. A spare tube, two tire levers, a mini pump, and the correct wrench for your axle nuts weigh little and turn a ride-ending flat into a short stop.
Summary
- Power off, remove the battery, and shift to the smallest cog before you start.
- Free the cable clips and unplug the motor connector, then loosen the axle nuts and torque arm.
- Support the wheel’s weight as you lower it out, and inspect the tire for the cause of the flat.
- Replace the tube when in doubt, inflate to the sidewall pressure, and refit the wheel in the original order.
- Torque the axle nuts to spec, reconnect the cable, and test the brakes and motor before riding.
References
- Schwinn, “How to Disconnect a Hub-Drive E-Bike Motor to Fix a Rear Flat Tire”: https://www.schwinnbikes.com/blogs/compass/how-to-disconnect-a-hub-drive-e-bike-motor-to-fix-a-rear-flat-tire
- Electric Bike Journal, “How to Remove eBike Rear Wheel”: https://www.electricbikejournal.com/how-to-remove-ebike-rear-wheel
- Upway, “How To Fix A Flat Tire On An E-Bike Quickly And Safely” (2026): https://upway.co/blogs/news/how-to-fix-a-flat-tire-on-an-e-bike

Leave a Reply