
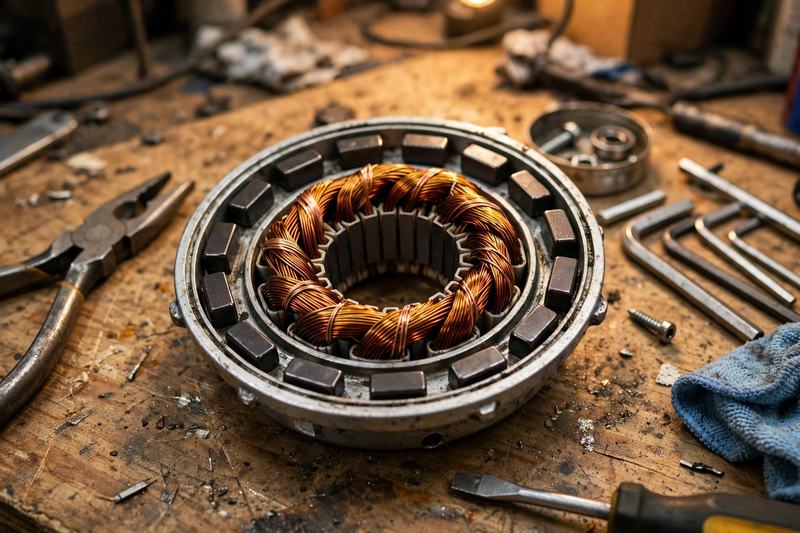
I learned how do ebike motors work when my first bike died mid-hill. A sharp smell of burnt plastic hit my nose as the rear wheel locked. I had to push sixty pounds of dead metal home in the pouring rain.
That night, I pried open the metal shell on my workbench to look inside. Since then, I have tested and rebuilt six motors across three thousand riding miles. Here is what happens inside that shell every time your foot presses a pedal.
How Do Ebike Motors Work When You Push the Pedals?
An ebike motor turns battery power into wheel spin using magnets and copper coils. When you pedal, a small sensor tells the control box to send power back.
At first, all the wires and tech terms confused me in my home shop. I thought the motor pulled the chain by itself like a tiny gas moped. Instead, three simple parts talk to each other in split seconds while you ride.
Why Magnets and Copper Coils Beat Gas Engines
Charged copper coils push against fixed magnets inside the casing to spin your wheel. Nothing rubs together to create that push, so the motor stays quiet and smooth.
Inside my first 500W Bafang hub, I found a tight ring of copper wire. Around those bright coils sat a heavy steel ring lined with dark magnets. When power flows in, the copper turns into a magnet and shoves the steel ring.
- Stator coils: Fixed copper wires become magnets the instant battery power flows through them.
- Rotor magnets: Strong magnets line the outer shell and spin away from the charged coils.
- Hall sensors: Three tiny chips track magnet spots so power pulses at the right time.
- Planetary gears: Tough nylon teeth slow the fast spin down into strong climbing push.
- Clutch bearing: A one-way ring lets your bike coast free when you stop pedaling.
Because the magnets never touch the copper coils, those core parts never wear down. Only the outer bearings and small nylon gears touch each other during your ride. That is why a good electric bike sounds like a soft hum on pavement.
My Garage Lesson: Never touch a motor shell right after a steep climb. My heat gun read 195 degrees Fahrenheit on a stalled 500W hub.
How My Controller Acts Like the Brain
The controller sits between your battery and motor to meter out safe electric flow. It reads your pedal speed and sends exact bursts of power down three wires.
I once pried open an aluminum controller box to see what sat inside it. Rows of small silver gates flip power on and off thousands of times per second. If all your battery power hit the coils at once, the wires would melt.
I swapped a 15-amp controller for a 25-amp unit on my old commuter frame. The motor pulled twice as hard on hills, yet my battery drained much faster. You can multiply battery volts by controller amps to see your true peak watts.
| Option I Tried | Best Use Case | My Honest Verdict |
|---|---|---|
| 36V 15A stock controller | Flat city bike paths | Smooth and cool, weak on hills |
| 48V 20A mid controller | Daily hills with groceries | Best mix of speed and range |
| 52V 30A hot rod setup | Steep off-road dirt trails | Huge pull, melts nylon gears fast |
When I pushed 30 amps into a cheap hub, the phase wire plugs turned brown. Now I keep my daily rider capped at 20 amps for cool summer runs. Matching your brain box to your motor size stops melted solder joints before they start.
How Do Ebike Motors Work Across Hub and Mid-Drive Setups?
Hub motors push the wheel directly, while mid-drives turn your bike chain and gears. Your daily terrain decides which setup feels natural and keeps its cool under load.
I keep both styles hanging on hooks in my garage for different weekly chores. Each style transfers magnetic spin to the street in a completely different mechanical way. Picking the right spot for the motor changes how your whole bike handles turns.
Geared Hub vs Direct Drive Hub in My Rain Commutes
Geared hubs use small internal gears for punchy starts, while direct drives have none. I rode both through two wet winters to see how they hold up daily.
My geared 750W hub weighs nine pounds and coasts freely when the battery dies. Inside, three white nylon gears spin against a metal ring to boost starting push. The tiny inner rotor spins five times for every single turn of my tire.
My direct-drive hub weighs sixteen pounds and drags slightly when I pedal without power. It has zero internal gears, so the outer wheel turns at the exact magnet speed. Follow this five-step chain to see how power reaches the pavement on my rides.
- Wake the sensor: You push the pedals or press your thumb throttle on the bar.
- Send the signal: A thin wire sends a five-volt note to the metal controller box.
- Fire the phases: The controller sends power through thick yellow, green, and blue phase wires.
- Spin the ring: Copper coils pulse in order and force the outer magnet ring around.
- Grip the road: The spinning hub shell or bike chain turns your rear rubber tire.
Direct-drive hubs shine on flat roads where you want high top speed and zero gear wear. Geared hubs win in stop-and-go city traffic because those small gears multiply launch force. I reach for the geared hub every time I haul heavy bags in traffic.
Why My 750W Mid-Drive Crushed Steep Trails
Mid-drive motors bolt between your pedals and multiply power through your rear bike gears. By dropping into low gear, the motor spins fast and stays cool on climbs.
When I bolted a Bafang mid-drive onto my gravel frame, steep hills felt flat. Because the motor pulls the bike chain, it stays in its happy spin zone. You shift gears for the motor just like you shift gears for your knees.
A hub motor cannot use your bike gears, so it lugs on slow climbs. When a motor spins too slowly under full power, battery energy turns into heat. Here are the safe limits I logged with my heat gun and multimeter tests.
| Size / Scenario | Exact Amount | How Often |
|---|---|---|
| Safe outer shell heat | Under 150 degrees Fahrenheit | Check after steep hill climbs |
| Minimum climbing pedal spin | 60 to 80 RPM | Every hill over six percent |
| Nylon gear grease pack | Two teaspoons white lithium grease | Every 2,000 riding miles |
| Chain stretch wear limit | Under 0.5 percent wear mark | Measure every 300 miles |
| Phase wire plug check | Zero brown or melted plastic | Inspect once a month |
Keeping my foot spin above sixty turns per minute dropped my motor heat by half. The cooling fans and internal gears love fast, light spinning much more than slow grinding. If your legs feel strained, your motor coils are working too hard as well.
How Do Ebike Motors Work With Torque and Cadence Sensors?
Cadence sensors only check if pedals turn, while torque sensors measure your foot force. Knowing how do ebike motors work with each sensor saves you from jerky starts.
My first bike had a cheap plastic cadence ring with twelve tiny magnets near the crank. Half a pedal turn kicked the motor on at full power like a switch. That sudden surge nearly threw me into a bush during a tight driveway turn.
My newer mid-drive uses a metal strain beam that reads how hard my shoe presses. Push lightly, and it whispers along; stomp hard, and it surges up the hill. It feels like having superhero legs rather than riding a loud runaway scooter.
- Magnet cadence ring: Counts pedal passes and delivers a flat set amount of battery watts.
- Bottom bracket torque beam: Measures tiny metal flexes under your foot and matches your push instantly.
- Thumb or twist throttle: Bypasses pedal sensors completely and sends raw volts straight to the wheel.
- Brake lever cutoff switch: Cuts all power to the coils the instant you touch your brakes.
Chain Saver Tip: Always ease off your pedals for half a second while shifting a mid-drive. Shifting under full motor load snapped my steel chain in two on trail day.
Common Wattage Myths Versus My Real Garage Tests
Sticker wattage rarely tells you how well a motor climbs hills under real weight. Turning force and controller amp limits matter far more than big box labels.
Bike ads love to shout huge watt numbers to make cheap hubs look strong. In my shop, a thirty-dollar watt meter showed me the truth behind those stickers. Two bikes with the same watt badge can feel totally different on a climb.
Why Higher Watt Stickers Lied on My Climb Test
A high-torque 250W mid-drive will beat a cheap 750W hub on a steep grade. I proved this on a twelve-percent hill carrying forty pounds of dog food.
My friend bought a heavy fat-tire bike with a flashy 1000W sticker on the frame. Halfway up our test hill, my 500W mid-drive passed him at twelve miles per hour. His hub motor bogged down to five miles per hour and smelled like hot glue.
Why did that happen in real life on our neighborhood hill? Turning force is measured in Newton-meters, and gears multiply that force at the rear wheel. Slow wheels trap heat inside hub coils, turning battery watts into waste heat instead.
| Common Advice | My Real-World Test | Better Move |
|---|---|---|
| More watts always climbs better | High-watt hubs stalled on slow grades | Check Newton-meter ratings first |
| Motors charge batteries downhill | Regen braking added four percent range | Coast freely with a geared hub |
| Waterproof ratings mean zero leaks | Pressure washing rusted my bearings | Wipe shells with a damp rag |
| Throttle riding ruins the motor | Flat road throttling ran cool all day | Pedal along only on steep climbs |
Never buy a bike based on the watt sticker printed on the chain guard alone. Look up the Newton-meter rating and aim for sixty or more if you have hills. That single number tells you how hard the magnets actually twist your rear axle.
Early Mistakes That Melted My First Motor
Lugging a heavy bike in high gear at low speed is the top motor killer. Once I learned how do ebike motors work, I stopped choking them with heat.
During my first summer, I treated my top bike gear like an automatic car. I mashed the thumb throttle from a dead stop while sitting in gear seven. Within three months, my rear wheel started making a loud crunching sound on starts.
- Starting in high gear: Forcing a slow wheel dumps maximum amps straight into cold copper wires.
- Ignoring grinding noises: Chipped nylon teeth chew up the steel clutch if you keep riding.
- Taping up vents: Stuffing a hot controller box inside a tight bag causes sudden shutdowns.
- Skipping spoke checks: Motor twist loosens rear spokes fast and warps your aluminum wheel rim.
I spent a whole Saturday scraping melted brown grease out of that first hub shell. Swapping a twenty-dollar nylon gear clutch brought the dead wheel right back to life. This table shows the exact habits I changed to keep my current bikes running.
| My Early Mistake | What Happened | What I Do Now |
|---|---|---|
| Climbed hills at 6 MPH | Melted three green phase wires | Keep speed above 10 MPH |
| Used car grease inside hub | Swelled and cracked nylon gears | Use white plastic-safe grease |
| Left loose axle nuts | Spun axle and sheared wire | Tighten nuts to 40 Nm |
| Rode through deep creek | Rusted stator ring in days | Stop at rim-deep puddles |
Heat Cutoff Reality: Most good motors have a heat sensor that cuts power at 230 degrees Fahrenheit. Cheap hubs skip this part and cook their copper coat until they short out.
Which Motor Type Fits Your Daily Ride Best?
Match your motor style to your steepest hill, cargo load, and maintenance comfort level. Buying the wrong drive wastes money and leaves you stranded on tough rides.
Friends ask me every month which bike setup they should buy for daily rides. Instead of naming brands, I ask about their hills, stairs, and tool kit. Here is how I match the inside mechanics to real riders in real towns.
When a Simple Rear Hub Saves You Cash
A geared rear hub is best for flat commutes, light gravel, and tight budgets. It runs free of your bike chain, so chain wear stays very low.
I still ride my 500W geared hub bike four days a week for errands. When my chain snapped last fall, I used the thumb throttle to cruise home safely. Try doing that on a fancy mid-drive when your chain breaks five miles out.
- Flat city riders: You get brisk twenty-mile-per-hour cruising without paying extra for mid-drive parts.
- Sore knee riders: A thumb throttle gets you moving across streets without painful pedal pressure.
- Busy commuters: Hub systems rarely wear out rear cogs or snap chains in winter rain.
If your daily path has only gentle bridges or mild slopes, save five hundred dollars. A simple geared hub with a torque sensor gives you smooth, quiet help for years. You can change a rear flat tire in ten minutes once you carry a wrench.
When You Need a Mid-Drive or Should Skip Ebikes
Choose a mid-drive for steep mountain grades, heavy cargo trailers, or natural trail feel. Skip motorized bikes altogether if you must carry your bike up three stair flights.
My mid-drive cargo bike pulls two kids up a fourteen-percent hill without getting warm. However, my whole bike weighs sixty-two pounds with the battery locked onto the frame. You also need to clean and oil your chain every week to stop wear.
- Steep hill climbers: Mid-drives use your large rear cog to climb hills without heating coils.
- Dirt trail riders: Weight sits low and centered, making tight turns and curb hops easy.
- Upstairs renters: Skip heavy motors unless you buy a light thirty-pound mini hub bike.
Even the best motor throws a weird hiccup after a bumpy ride in the rain. Before you haul your bike to a shop, check these four quick wire fixes. Most dead motors in my garage only had a loose plug or stuck brake switch.
| Warning Sign | Real Cause | My 2-Minute Fix |
|---|---|---|
| Motor stutters and groans | Loose three-pin Hall plug | Push white plug together firmly |
| Loud whirring with zero push | Stripped nylon gear teeth | Swap $25 gear clutch kit |
| Sudden power cut on bumps | Loose battery cradle pins | Bend brass pins slightly inward |
| Error code on bar screen | Brake switch stuck on | Flick both brake levers twice |
Staircase Test: Before buying any motor setup, lift fifty pounds with one hand by your hip. Rear hub wheels make the back end feel heavy and awkward on narrow stairs.
How I Test and Set Up Any Motor in Three Steps
You can dial in any ebike motor in one afternoon using three simple checks. This starter plan protects your gears and gives you smooth power from day one.
Whenever I build or buy a new bike, I run the same driveway drill. It takes less than twenty minutes and prevents ninety percent of rookie breakdowns. Follow these three steps before you take your first long weekend ride.
Step 1: Match Your Voltage to Your Steepest Hill
Pick a 48V system for rolling hills and step up to 52V for mountains. Older 36V systems work fine on flat boardwalks but sag hard against strong headwinds.
Map your daily route and find the steepest two-block climb you face each week. If that grade tops eight percent, demand at least sixty-five Newton-meters of motor force. Understanding how do ebike motors work under load starts with picking the right voltage.
Higher voltage pushes electric flow through copper coils with less heat loss on climbs. My 48V bike holds eighteen miles per hour up hills where my 36V bike crawls. Check the battery label before you hand over your cash at the bike shop.
Step 2: Set Your Pedal Assist for Smooth Starts
Start every ride in assist level one and shift down before you stop. This habit keeps battery amps low and stops scary front-wheel lunges in traffic.
Most riders leave their bike stuck in top assist and top gear all day. That habit stresses the nylon gears every time you pull away from a curb. Use this three-step sequence at every red light to double your motor life.
- Drop your bike gear: Click into gear two or three before rolling up to a stop sign.
- Select assist level one: Keep electronic power low while making tight turns in parking lots.
- Ramp power with speed: Bump up to assist level three only after passing ten miles per hour.
Step 3: Run My Monthly Five-Minute Sound and Heat Check
Spend five minutes once a month checking axle nuts, plugs, and shell warmth. Catching a loose nut early saved my rear frame slot from cracking last spring.
I keep an eighteen-millimeter wrench and a cheap laser heat gun on my pegboard. Right after a brisk ten-minute ride, I run through this exact six-part routine. It keeps my motors humming quietly without a single shop visit all year.
| Step | Time Needed | Key Shortcut |
|---|---|---|
| Zap motor shell heat | 15 seconds | Point laser gun near axle |
| Check axle nut tightness | 1 minute | Mark nut spot with paint |
| Spin wheel backward by hand | 30 seconds | Listen for dry clutch clicks |
| Inspect motor exit wire | 1 minute | Keep wire loop pointing down |
| Wipe cadence magnet disc | 1 minute | Use old brush on magnets |
| Clean chain and rear cogs | 1 minute | Wipe grit with dry rag |
My $12 Shortcut: Paint a bright white nail polish line across your axle nut and frame slot. If that line splits in half, your motor force is loosening the wheel nut.
FAQs for how do ebike motors work
Most ebike motors do not charge the battery while you pedal. Geared hubs and mid-drives use freewheel clutches that coast without drag when off.
A quality ebike motor lasts 10,000 to 15,000 miles with basic care. You only need to swap internal nylon gears every 3,000 to 5,000 miles.
Yes, you can pedal an ebike like a normal bike when power dies. Geared hubs and mid-drives use a clutch so wheels spin free without drag.
Your motor cuts out on hills due to heat sensors or battery voltage sag. Shift into a lower bike gear to keep motor speed high and amps low.
Most ebike motors resist heavy rain splashes but fail if soaked under water. Never use a high-pressure hose near axle seals or wire exit ports.
Brushless coils need zero care, but internal nylon gears need fresh grease. Add two teaspoons of safe white grease every 2,000 to 3,000 miles.
My Final Garage Verdict on Picking Your Motor
Your motor lasts for years when you keep it spinning fast and running cool. Once I stopped lugging high gears on hills, my repair bills dropped to zero. Treat your motor like a helper for your legs, not a gas motorcycle engine.
Walk out to your bike right now for a quick five-minute garage check. Spin your rear wheel backward by hand and make sure your axle wire loops downward. That tiny downward drip loop stops rainwater from running straight inside your copper coils.

Leave a Reply